Pete

Author Archives

  • Steps To Create A Simple SAP ADOBE Form And Calling It In A Web Dynpro ABAP Application

    In this step by step guide we will create a simple SAP Adobe Form showing employee address and then call this form in our Web Dynpro ABAP Application. To develop SAP Adobe forms you will require the Adobe Life Cycle Designer installed in your system and Adobe Document Services (ADS) installed and configured on the server.

    Step 1. Creating The Form Interface

    Go to transaction code SFP. Select the radio button ‘Interface’, give a name to your interface and click on the create button.

     SAP Form Builder

    In the Create Interface pop-up give a description and then click on the ‘Save’ button.

    Create an SAP Interface

    Provide the Transport package and the transport request details.

    Double click on the import parameter of the form interface and create a     new import parameter PERNR of type PERNR-PERNR.

  • Learn How To Create An SAP General Ledger Account For COA & Company Code

    Concept Of General Ledger Accounts

    The SAP general ledger is similar to the general ledger used by accountants to record business transactions using the double entry accounting system. The general ledger accounts are used by the businesses to record all the day to day transactions. These transactions, recorded throughout a certain period are then used later on to create the financial statements like the balance sheet, profit and loss statement and the cash flow statement. This same data can also be used to create reports for internal reporting and auditing purposes. The same data can be provided to modules like business intelligence to carry out advance analysis.

    It is necessary to enter information about the general ledger account into ypur SAP system before you can used it to record business transactions. The master record of the general ledger account contains all the information which is needed by other modules to use that account. Some of this information is specific to a company code like the currency in which the account balances are maintained, whereas some of the information about the general ledger account is common across company codes like the description of a tax account.

    The general ledger master record has a total of six tabs to store the various blocks of information about the general ledger account. Three of the tabs contain information about the general ledger account which is specific to a company code while the other three tabs contain information about the general ledger account which will remain common across all company codes. On the basis of the information being entered for a general ledger account, it can be created in the following three ways:

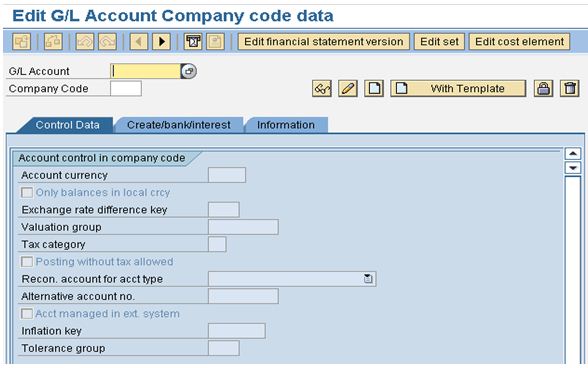
    •  IN COMPANY CODE:The company code data includes three tabs i.e. control data, bank data and information. These three tabs include information about the G/L account which is specific to the particular company code in which the G/L account is being created like the tolerance group of the account.

    General Ledger Account Company Code Data


    • IN CHART OF ACCOUNTS:The chart of accounts data of the G/L account includes three tabs i.e. description, keyword and information as shown in figure 2 below. The Chart of Accounts data about the general ledger is common across company codes like the account number. This data can be entered once at the Chart of Account level and can be used by multiple company codes. This saves the user from entering the same data again and again. It also ensures greater consistency and reduces the possibility of errors due to manual data entry.
  • Want to Learn SAP ABAP? The full Video Course Is Ready – What Next?

    I'm Happy... I just learnt SAP ABAPEarlier this week I finally completed the full version of the ‘Beginners Guide To ABAP‘. I decided to give the course its own website so not to get muddled up with the mixed bad of SAP content here.

    Lots of people jumped on-board when I released it which I am super happy about. The course ended up taking me around 1 year to complete. This is way longer than I thought it would. Partly due  to work commitments, well actually a lot due to work commitments, but also down to underestimating just how much work is involved in producing a quality training product.

    Whilst making the videos and editing afterwards there was lots of content that was given the axe for all sorts of reason.

    1. Poor video.
    2. Poor Sound.
    3. What I recorded didn’t make sense!!
    4. I could go on and on.

    Goal #1 Achieved

    When I finally finished editing the last video I thought… finally the job is done. That feeling didn’t last long. Then came to realisation that I had another job – building a website to house the course.

    After a bit of domain name searching I came upon abapcourse.com. Then got my WordPress coding hat on and went to work. The website took me about 2 weeks to complete. It may sound a long time but I had to figure out the payment processing, membership system etc…

    Anyway, it’s done. Now I can relax a little and I hope the students who are taking the course really apply themselves and learn ABAP well. The course has taken a lot of work on my part and I have put my heart and soul into making it the most affordable and high quality course on SAP ABAP on the interwebs.

    I would love to know your thoughts and if you have any questions just let me know. Heck, hit me up on Skype if you want … pete_m1 (no spam please).

  • How To Use Inbound And Outbound Plugs In SAP Web Dynpro ABAP Programs

    In a previous article we have seen how to create a simple SAP Web Dynpro ABAP application with only one view. Now, in this article we modify that application by adding one more view and learn how to navigate between two views using inbound and outbound plugs.

    Step 1. Adding Views

    1.1 Go to Transaction SE80, choose Web-Dynpro-Comp. / Intf. in the object list and enter the name of your Web Dynpro application (Y_FIRST_WEBDYNPRO) and click on Display.

    Adding Views To Object Navigator

  • Setting Up The SAP Fiscal Year Variant For New Implementations

    Concept Of A Fiscal Year

    Every business has to follow a certain accounting cycle in order to record the business transactions. Some businesses follow a January to December cycle while other businesses may follow an April to March cycle. The choice of the accounting year or the fiscal year depends on the business requirements. The fiscal year is usually a 12 month period over which all the business transactions are recorded. At the end of this period financial statements are prepared to review the performance of the business. These business requirements for the accounting year can be mapped into SAP by using a two alphabet identifier called the fiscal year variant.

    A posting period is a period contained in the fiscal year over which transactions are recorded and clubbed together. Every transaction that is recorded in SAP has to be assigned to a posting period. Normally, every month is considered as a posting period which results in a total of 12 posting periods in a financial year. The special periods are meant for the year-end closing transactions. It provides flexibility to the accounting department to make adjustment entries while executing the year-end closing process.

    The fiscal year variant can be used to define the following:

    • Number of normal posting periods available in a financial year.
    • Number of special posting periods available in a financial year.
    • The duration of the accounting cycle i.e. a complete fiscal year or a shortened fiscal year.
    • Whether the fiscal year is the same as the calendar year.
    • Procedure to determine the current period while posting.

    The fiscal year variant is defined at the client level and is therefore available to all the company codes in the client. If there is more than one company code which uses the same fiscal year configuration, then the configuration need not be defined again and again for each of the company codes. The settings can be defined one as once as a fiscal year variant and can then be assigned to multiple company codes. This saves time during new implementations and also reduces the errors that may happen due to repeated manual entry. The fiscal year variant is first defined and then it is assigned to the company codes for which it is to be used.

    The fiscal year variant is one of the first configurations that is needed to be done while setting up the organizational structure in SAP. No transactions can be recorded without defining the fiscal year variant and assigning it to the company code. The fiscal year variant is used to define the normal and the special posting periods that are available for posting business transactions in a company code and the posting period variant is used to control which of these periods is open for posting.

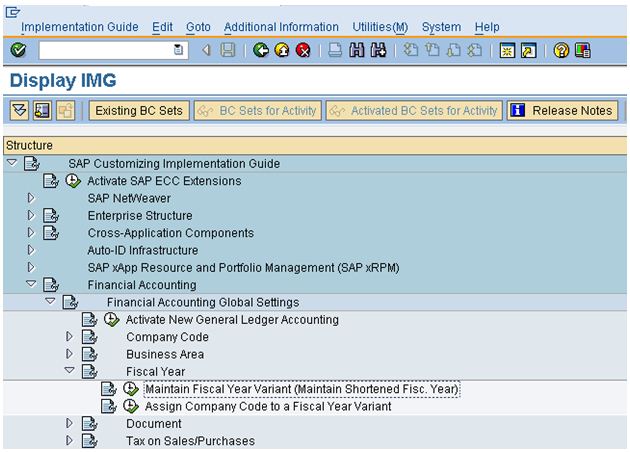
    Navigate to the implementation guide menu as shown in the screenshot below or execute the transaction code OB29 from the SAP Easy access menu display the fiscal year variant configuration screen.

    Navigate To The Fiscal Year Variant Menu Path

  • Beginners Guide – Learn SAP ABAP – Enter Data Into Our Database Table

    Now our table has been created we can enter records directly into it using some of the SAP ABAP Workbench tools for data entry. This video shows how to navigate to the data entry options and a few tips on screen set-up. For Reference You can get the the data entry screen through your ABAP […]