10 Must Know SAP ABAP Character String Coding Techniques

Declaring C and N Fields

This article will discuss character strings. When creating programs, fields defined as char­acter strings are almost always used. In SAP, there are two elementary data types used for character strings. These are data type C, and data type N.

Data type C.

Data type C variables are used for holding alphanumeric characters, with a minimum of 1 character and a maximum of 65,535 characters. By default, these are aligned to the left.

Follow along and create a new program. From the ABAP Editor’s initial screen, create a new program, named “Z_Character_Strings”. Title this “Character Strings Examples”, set the Type to ‘Executable program’, the Status to ‘Test program’, the Appli­cation to ‘Basis’, and Save.

Create a new DATA field, name this “mychar” and, without any spaces following this, give a number for the length of the field in parentheses. Then, include a space and define the TYPE as c

clip_image002

This is the long form of declaring a type c field. Because this field is a generic data type, the system has default values which can be used so as to avoid typing out the full length of the declaration. If you create a new field, named “mychar2” and wish the field to be 1 character in size, the default field size is set to 1 character by default, so the size in brackets following the name is unnecessary. Also, because this character field is the default type used by the system, one can even avoid defining this. In the case of mychar2, the variable can be defined with only the field name. The code in the image below performs exactly the same as if it was typed “data mychar2(1) type c”:

clip_image004

In the previous article on calculations, the table “zemployees” included various fields of type c, such as “zsurname”. If one uses the TABLES statement followed by zemployees, then by double-clicking the table name to use forward navigation and view the table, one can see that the “surname” field is of data type CHAR, with length 40. This declaration can be replicated within the ABAP program:

clip_image006

Return to the program, and in place of mychar2, create a new field named “zemployees1”, with a length of 40 and type c. This will have exactly the same effect as the previous decla­ration. Referring back to previous article, another way of doing this would be to use the LIKE statement to declare zemployees (or this time zemployees2) as having the same properties as the “surname” field in the table:

clip_image008

Data type N.

The other common generic character string data type is N. These are by default right-aligned. If one looks at the initial table again, using forward navigation, the field named “employee”, which refers to employee numbers, is of the data type NUMC, with a length of 8. NUMC, or the number data type, works similarly to the character data type, except with the inbuilt rule to only allow the inclusion of numeric characters. This data type, then, is ideal when the field is only to be used for numbers with no intention of carrying out calculations.

clip_image010

To declare this field in ABAP, create a new DATA field named “znumber1”, TYPE n. Again, alternatively this can be done by using the LIKE statement to refer back to the original field in the table.

clip_image012

String Manipulation

Like many other programming languages, ABAP provides the functionality to interrogate and manipulate the data held in character strings. This section will look at some of the popular statements which ABAP provides for carrying out these functions:

  • Concatenating String Fields
  • Condensing Character Strings
  • Finding the Length of a String
  • Searching for Specific Characters
  • The SHIFT statement
  • Splitting Character Strings
  • SubFields

Concatenate

The concatenate statement allows two character strings to be joined so as to form a third string. First, type the statement CONCATENATE into the program, and follow this by specifying the fields, here “f1”, “f2” and so on. Then select the destination which the out­put string should go to, here “d1”. If one adds a subsequent term, [separated by sep] (“sep” here is an example name for the separator field), this will allow a specified value to be inserted between each field in the destination field:

clip_image014

Note: If the destination field is shorter than the overall length of the input fields, the char­acter string will be truncated to the length of the destination field, so ensure when using the CONCATENATE statement, the string data type is being used, as these can hold over 65,000 characters.

As an example, observe the code in the image below.

clip_image016

The first 3 fields should be familiar by now. The fourth is the separator field, here again called “sep” (the size of sep has not been defined here, and so it will take on the default which the system uses – 1 character). The last field is titled “destination”, 200 characters long and of data type c.

Below this section is the CONCATENATE statement, followed by the fields to combine together into the destination field. The WRITE statement is then used to display the result. Executing this code will output the following:

clip_image018

Note that the text has been aligned to the left, as it is using data type c. Also, the code did not include the SEPARATED BY addition, and so the words have been concatenated without spaces. This can be added, and spaces will appear in the output:

clip_image020

clip_image022

Condense

Next, the CONDENSE statement. Often an ABAP program will have to deal with large text fields, with unwanted spaces. The CONDENSE statement is used to remove these blank characters.

Now, observe the code below:

clip_image024

This should, of course, be mostly familiar from the last section, with the addition of the new, 20-character “spaced_name” field, with large spaces between the individual words. Below we have an example of using the CONDENSE statement using our new variable:

clip_image026

The CONDENSE statement will remove the blank spaces between words in the variable, leaving only 1 character’s space:

clip_image028

NO-GAPS

An optional addition to the CONDENSE statement is NO-GAPS, which as you may guess, removes all spaces from our variable.

clip_image030

clip_image032

Find the Length of a String

To find the length of a string, a function rather than a statement is used. Added beneath the previous data fields here, is a new one titled “len”, with a TYPE i, so as to just hold the integer value of the string length.

clip_image034

The code to find the length of the ‘surname’ field and display it in the ‘len’ field appears like this, with “strlen” defining the function:

clip_image036

The output, then, will appear like this:

clip_image038

Replace

Below I have created the “surname2” field and is 40 characters in length. Note that no TYPE has been defined, so the system will use the default type, c:

clip_image040

Some text is then moved into the field after which the REPLACE statement is used to replace the comma with a period:

clip_image042

clip_image044

One thing to note here is that the REPLACE statement will only replace the first occurrence in the string. So if, for example, the surname2 field read “Mr, Joe, Smith”, only the first comma would be changed. All occurrences of comma’s could be replaced by making use of a while loop, which will be discussed later on.

Search

Next, a look will be taken at searching for specific character strings within fields. Unsur­prisingly, the statement SEARCH is used for this.

All that is needed is to enter SEARCH followed by the field which is to be searched, in this instance the surname2 field. Then the string which is to be searched for, for example, ‘Joe’:

clip_image046

Note that here no variable has been declared to hold the result. In the case of the SEARCH statement, two system variables are used. The first is “sy-subrc”, which identifies whether the search was successful or not, and the second is “sy-fdpos”, which, if the search is suc­cessful, is set to the position of the character string searched for in surname2. Below, a small report is created to show the values of the system variables.

clip_image048

SEARCH Example 1

The first SEARCH statement, below, indicates that the surname2 field is being searched, for the character string ‘Joe ‘. The Search statement will ignore the blank spaces. The output will show the string being searched for, followed by the system variables and the value results. In this case, the search should be successful.

clip_image050

SEARCH Example 2

The next example is very similar, but the full stops either side of ‘.Joe .’ mean that the blank spaces this time will not be ignored and the system will search for the full string, including the blanks. Here, the search will be unsuccessful, as the word ‘Joe’ in the Surname2 field is not followed by four blank spaces.

clip_image052

SEARCH Example 3

This third search uses a wild card character ‘*’ and will search for any words ending in ‘ith’. This, again, should be successful.

clip_image054

SEARCH Example 4

The last example also uses the wild card facility, this time to search for words beginning with ‘Smi’, which again should be successful. Compare the places in the code where the * appears in this and the previous example.

clip_image056

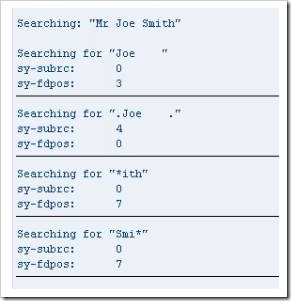
Run a test on these searches, and output returns as follows:

clip_image058

When the sy-subrc = 0 this refers to a successful search. When sy-subrc = 4 in the second example this indi­cates that the search was unsuccessful.

In the first search, the sy-fdpos value of 3 refers to the third character in the surname2 field, the offset, and the search term appears one character after this. The failure of the second search means that a 0 is displayed in the sy-fdpos field. The value of 7 in the sy-fdpos fields for the final two searches both mean that the word ‘Smith’ was found, corresponding to the search terms, and that the searched word appears 1 character after the offset value.

Shift

The SHIFT statement is a simple statement that allows one to move the contents of a character string left or right, character by character. In this example, a field’s contents will be moved to the left, deleting leading zeros. Declare a new DATA variable as follows: “empl_num”, 10 characters long, and set the content of the field to ‘0000654321’, filling all 10 characters of the field:

clip_image060

clip_image062

Using the SHIFT statement, then, the 4 zeros which begin this character string will be re­moved, and the rest moved across to the left. Type the statement SHIFT, fol­lowed by the field name. Define that it is to be shifted to the left, deleting leading zeros (don’t forget the help screen can be used to view similar additions which can be added to this statement). Then include a WRITE statement so that the result of the SHIFT statement can be output. To the right of the number here, there will be four spaces, which have re­placed the leading zeros:

clip_image064

clip_image066

If no addition to the SHIFT statement is specified, the system will by default move every­thing just one character to the left, leaving one space to the right:

clip_image068

clip_image070

The CIRCULAR addition to the SHIFT statement will cause, by default, everything to move one space to the left again, but this time the character which is displaced at the beginning of the statement will reappear at the end, rather than leaving a blank space:

clip_image072

clip_image074

Split

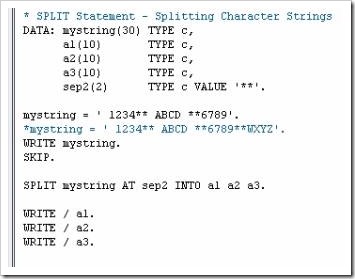
The SPLIT statement is used to separate the contents of a field into two or more fields. Observe the code below:

clip_image076

The first section contains several DATA statements, “mystring”, “a1”, “a2”, “a3” and “sep2”, along with their lengths and types. “Sep2” here is a separator field, with a value of ‘**’.

mystring” is then given a value of ‘ 1234** ABCD **6789’, followed by a comment line (which the program will ignore), then a WRITE statement, so that this initial value appears in the output followed by a blank line, using the SKIP statement.

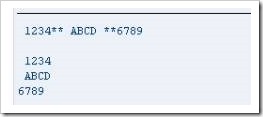
The SPLIT statement appears, followed by the name of the string which is to be split. The AT addition appears next, telling the program that, where “sep2” appears (remember the value of this is ‘**’), the field is to be split. Following this, the INTO then specifies the fields which the split field is to be written to. The slightly odd positioning of the spaces in the value of “mystring” will, when the statement is output, make clear the way that the SPLIT statement populates the fields which the data is put into. Execute the code, and this is the result:

clip_image078

You can see that the initial field has been split into a1, a2 and a3 exactly where the ** ap­peared, leaving a leading space in the first two fields, but not in the third. Additionally, on closer inspection there are blank spaces following the numbers in each field up to its defined length, which is 10.

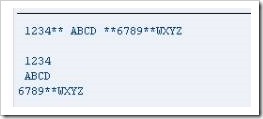
This next example shows the initial value of “mystring” now is made into a comment line, and the comment line becomes part of the code:

clip_image080

‘mystring’ now contains the original contents plus a further set of characters. While the contents are still to be split into 3 fields, the data suggests it should be split into 4. In this case, with less fields than those defined, the system will include the re­mainder of the string in the final field. Note that if this field is not long enough for the remainder, the result would be truncated.

clip_image082

SubFields

Within ABAP, you have the option of referring to specific characters within a field. This is referred to as processing subfields, whereby a specific character’s position within its field is referenced. Again, observe the code below:

clip_image084

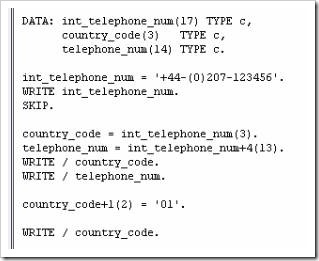
To start with, new DATA variables are declared, “int_telephone_num”, “country_code” and “telephone_num”, along with lengths and types. Following this, a character string is assigned to int_telephone_num, a WRITE statement for this string and a blank line.

Next, the subfield processing appears. The first line states the country_code field is to be filled with the first 3 characters of the int_telephone_num field, indicated by the number in brackets.

Then, the field telephone_num is to be filled with 13 characters of the int_telephone_num field, starting after the 4th character. The +4 part of the code here refers to where the field is to begin. Then we have WRITE statements for both of the fields.

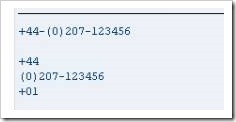
This last example indicates that the specific characters of int_telephone_num moved to the country_code field will be replaced, after the first character, by the literal, 2-character value ‘01’, showing that a subfield can itself be edited and updated without changing the initial field. The results should look like this:

clip_image086

Subfields are regularly used in SAP to save time on creating unnecessary variables in memory. It is just as easy to use the subfield syntax.

How To Add Favorites To Your SAP Menu

Are you struggling to remember SAP transaction codes? Are you using too many clicks to drill down to the SAP transactions you frequently use? A super useful feature that many consultants and SAP users forget is: FAVORITES on the SAP menu.

Creating Favorites allow you to build your own SAP personalized menu. The transactions you use day in day out will be just a click away and named according to your preferences.

SAP Favourite Basics

You can manage your own SAP menu Favorites in 2 ways:

  1. The SAP menu bar:
    SAP Favourite Menu Bar
  2. Right click on the Favorites folder to access its context menu:SAP Favourite Context Menu

Using the Favorites menu on the SAP menu bar or the context menu of the Favorites folder, you can: Continue reading

How To Modify Data In A SAP Database Table Using ABAP

Authorisations

When writing programs using open SQL, one has to bear in mind the concepts of authorisation in an SAP system. An SAP system has its own security tools to ensure that users can only access data which they are authorised to see. This includes individual fields as well as individual records. The way authorisations are set up can also limit how data is used, whether a user can only display data or whether they can modify it. All the rules pertaining to this are stored as authorisation objects. These will not be examined in great detail here, but ordinarily users are assigned their own authorisation profile (or composite profile) against their user record, which for informational purposes is managed through transaction code SU01.

This profile then gives the user the correct rights within the program to then carry out their job and SAP delivers many predetermined user profiles with the base system. The system administrators can then use and enhance these to be applied to users. Once a user has one of these profiles, the system will tell them whether or not they can execute a transaction when they try to do this. For example, transaction SE38, the ABAP editor, could be tweaked so that while some users may be able to access it, perhaps they can only do so in display mode, or perhaps they can display and debug the code, but not change it themselves.

Where specific authorisations have not been implemented, programs can be made to carry out an authority check, using the statement AUTHORITY-CHECK. This must be used if a program or transaction is not sufficiently protected by the standard authorisation profiles already set up in the system.

While, this will not be examined in great detail here (the topic is huge in itself), it is important to bear authorisations in mind when working in SAP.

Fundamentals

So far, reading data from database tables has been looked at, now modifying and deleting this data will be examined. There are some important concepts to keep in mind here, for example, the architecture of the system. If one has a three-tier architecture (with a presentation layer, an application server and an underlying database), you must bear in mind that there may be a very large number of users accessing the data at any one time.

It is important to ensure that programs created do not cause any problems in the rest of the system and that the most recent version of the data held on the database is accessed when a program runs. If records are constantly being updated, programs must be able to read and work with data which is current in the system. Fortunately, most of this work is done automatically by the SAP system, and one doesn’t have to worry too much about the underlying technologies related to how data is locked and so on.

One of the key tools which can be used is Open SQL. This acts as an interface between the programs created and the database. By using Open SQL, one can read and modify data, and also buffer data on the application server, which reduces the number of database accesses the system has to perform. It is the database interface which is also responsible for synchronising the buffers with the database tables at predetermined intervals.

When one is creating programs it is important to keep in mind that if data is buffered, and this buffered data is subsequently read, it may not always be up to date. So, when tables are created, they must be created in such a way that the system is told that buffering can or cannot be used, or that it can only be used in certain situations. When the example tables were created earlier, the system was told not to use buffering. Using this setting means that every time data is read from a table, it will always use the most up to date records.

Buffering can be useful for tables which hold master data and configuration settings, because this kind of data does not get updated regularly. When one is working with transactional data however, one wants this data to be as up to date as possible. If transactional data is being used in a context where tables are using buffering, it is important to ensure that programs related to this can take this into account, and make sure that the buffer is updated with new data when this is needed.

When one uses Open SQL statements in a program, tables can only be accessed through the ABAP dictionary. This acts as an interface, one does not access the tables directly through programs. This is not a problem however, as when one uses Open SQL statements, it works just the same as if one was accessing the database directly. Open SQL manages its interface with the database by itself, without the need for the user to do anything here. Statements can be coded just as though they had direct access to the tables, though with the underlying knowledge that by using Open SQL, the data is in fact being accessed through the ABAP dictionary with a built-in level of safety to ensure the ABAP code does not have a direct effect on the SAP database system itself.

Database Lock Objects

Now, locking concepts will be considered. This refers to locking data in database tables and there are two basic types of locking which must be kept in mind. First of all, database locks. These lock data in a physical database. When a record is updated, a lock is set on this, then when it is updated the lock is released. It is there to ensure that, once set, the data can only be accessed and updated by those authorised to do so. When released, it can be accessed more widely.

These locks, though, are not sufficient in an SAP system, and are generally only used when a record is being modified in a single step dialogue process. This process refers to any time that the data in a database can be updated in a single step, on a single screen. In this case, the data can be locked, updated and released very quickly.

As you work more with SAP, the insufficiency of database locks will become clearer, because transactions in an SAP system often occur over multiple steps. If, for example, an employee record is added to the system, one may have to fill in many screens of data. The user in this case will only want the record to be added to the system at the end of the last screen, once all of the data in all of the screens has been input. If just the first screen’s data was saved into the database, then the second’s, and so on, one by one, if the user were to quit halfway through the process, an invalid and unfinished record would be in the database.

This demonstrates the hazard of using database locks with multi-step dialogue processes. For these instances, SAP has introduced a new kind of lock, independent of the database system. These are called lock objects, and allow data records to be locked in multiple database tables for the whole duration of the SAP transaction, provided that these are linked in the ABAP dictionary by foreign key relationships.

SAP lock objects form the basis of the lock concept, and are fully independent of database locks. A lock object allows one to lock a record for multiple tables for the entire duration of an SAP transaction. For this to work, the tables must be linked together using foreign keys. The ABAP dictionary is used to create lock objects, which contain the tables and key fields which make up a shared lock.

When the lock object is created, the system automatically creates two function modules, which will be discussed later. These function modules are simply modularised ABAP programs that can be called from other programs. The first of these has the action of setting a lock, and the second releases this lock. It is the programmer’s responsibility to ensure that these function modules are called at the correct place in the program. When a lock is set, a lock record is created in the central lock table for the entire SAP system. All programs must adhere to using the SAP lock concept to ensure that they set, delete and query the lock table that stores the lock records for the relevant entries.

Lock objects will not be discussed much further, however subsequent programs created, tables accessed and so on here will be done on the assumption that they are not to be used outside of one’s own system.

Using Open SQL Statements

Now, some of the Open SQL statements which can be used in programs will be looked at. As mentioned before, Open SQL statements allow one to indirectly access and modify data held in the underlying database tables. The SELECT statement, which has been used several times previously, is very similar to the standard SQL SELECT statement used by many other programming languages. With Open SQL, these kinds of statements can be used in ABAP programs regardless of what the underlying database is. The system could be running, for example, an Oracle database, a Microsoft SQL database, or any other, and by using Open SQL in programs in conjunction with the ABAP dictionary to create and modify database tables, one can be certain that the ABAP code will not have any issues accessing the data held by the specific type of database the SAP system uses.

When the first database table was created previously, the field MANDT was used, representing the client number and forming part of the database table key, highlighted below:

clip_image002

One may think that, given the importance of this field, it would have to be used in ABAP programs when using Open SQL statements, however, it does not. Almost all tables will include this ‘hidden’ field within them, and the SAP system is built in such a way that a filter is automatically applied to this field, based on the client ID being used. If one is logged in, for example, to client 100, the system will automatically filter all records in the database on this client key and only return those for client 100. When Open SQL is used in the programs one creates, the system manages this field itself, meaning it never has to be included in any selections or update statements used in programs. Also, this carries the benefit of security in the knowledge that any Open SQL statement executed in a program will only affect the records held in the current client.

Using Open SQL Statements – 5 Statements

There are 5 basic Open SQL statements which will be used regularly in programs from here forward. These are SELECT, INSERT, UPDATE, MODIFY and DELETE.

  • The SELECT statement has, of course, already been used. This statement allows one to select records from database tables which will then be used in a program.
  • INSERT allows new records to be inserted into a database table.
  • UPDATE allows records which already exist in the table to be modified.
  • MODIFY performs a similar task to update, with slight differences which we will discuss shortly.
  • DELETE, of course, allows records to be deleted from a table.

Whenever any of these statements are used in an ABAP program, it is important to check whether the action executed has been successful. If one tries to insert a record into a database table, and it is not inserted correctly or at all, it is important to know, so that the appropriate action can be taken in the program. This is done using a system field which has already been used: SY-SUBRC. When a statement is executed successfully, the SY-SUBRC field will contain a value of 0, so this can be checked for and, if it appears, one can continue with the program. If it is not successful, however, this field will contain a different value, and depending on the statement, this value can have different meanings. It is therefore important to know what the different return codes are for the different ABAP statements, so as to recognise problems and take the correct course of action to solve them. This may sound difficult, but with practice will become second-nature.

Insert Statement

The SELECT statement has already been used, so here it will be skipped for now to focus on the INSERT statement. In this example then, a new record will be inserted into the ZEMPLOYEES table. Firstly, type INSERT, followed by the table name, and then a period:

clip_image004

Doing this, one must always type the table name, a variable’s name cannot be used instead. Use the check statement (IF) to include an SY-SUBRC check, telling the system to do if this does not equal 0:

clip_image006

This is the simplest form of the INSERT statement, and not necessarily the one which is encouraged. Using this form is no longer standard practice, though one may come across it if working with older ABAP programs.

In the above statement, nothing is specified to be inserted. This is where the concept of the work area enters. The statement here expects a work area to exist which has been created when an internal table was declared. This type of work area is often referred to as a header record:

clip_image008

The table above shows the yellow area as a standard table containing four records and their respective fields, the area above in grey is the header record, which is stored in memory and is the area which is accessed when the table is referenced from a program only by its table name. If an INSERT statement is executed, whatever is contained in the header record will be inserted into the table itself. The header record does not exist in the table, it is just an area stored in memory where a current record can be worked with, hence the term work area. When someone refers to the table only by its table name, it is the header record which is referred to, and this can become confusing. One thinks that one is referencing the table itself, but in fact it is the header record which is being worked with, a record held in memory with the same structure as the table. ABAP objects, which are important when one gets to a more advanced stage in ABAP, will not allow a header record to be referred to, so it is important not to do this. Header records were used commonly for this in the past, but as noted previously, this is no longer the way things are done.

To avoid confusion when working with internal tables should programs must work with separate work areas, which are perhaps similar in structure to a header record, but not attached to the table, with a separate name. These are separate structures from the initial table, which are created in a program.

clip_image010

To declare a work area the DATA statement is used. Give this the name “wa_employees”. Now, rather than declaring one data type for this, several fields which make up the table will be declared. The easiest way to do this is to use the LIKE statement.

So here, the wa_employees work area is declared LIKE the zemployees table, taking on the same structure without becoming a table itself. This work area will only store one record. Once this is declared, the INSERT statement can be used to insert the work area and the record it holds into the table. The code here will read “INSERT zemployees FROM wa_employees”:

clip_image012

Additionally, using this form of the INSERT statement allows you to specify the table name using a variable instead. It is important to note here that if one is doing this, the variable must be surrounded by brackets.

Now, the work area must be filled with some data. Use the field names from the zemployees table. This can be done by forward navigation, double-clicking the table name in the code, or by opening a new session and using SE11. The fields of the table can then be copy & pasted into the ABAP editor and the work area’s fields populated as in the image below:

clip_image014

The check statement can then be formulated as follows, meaning that if the record is inserted correctly, the system will state this, if not then the SY-SUBRC code which will not equal zero is will be displayed:

clip_image016

Check the program, save, and activate the code, then test it. The output window will display:

clip_image018

If you check the records in your table via the ‘Data Browser’ screen in the ABAP dictionary, a new record will be visible:

clip_image020

For practice use the ABAP debugger to execute the code step-by-step. First, delete the record from the table in the ABAP dictionary and put a breakpoint in the code at the beginning of the record entry to the work area:

clip_image022

Now execute the program. The breakpoint will cause program execution to pause at your breakpoint and the debugger will open:

clip_image024

Firstly, use the Fields mode to view the work area structure. Double click the wa_employees after the DATA statement and it will appear in the ‘Field names’ box at the bottom. At this point the work area is completely empty, evidenced by the zeros in the adjacent box. To display the full structure, double click the wa_employees in the left box:

clip_image026

clip_image028

Then, execute each line of code starting from the breakpoint using the F5 key, the fields within this structure view are filled one by one:

clip_image030

Return to the Fields view before executing the INSERT statement, and observe the SY-SUBRC field at the bottom of the window. It displays a value of 0. If there are any problems in the execution, this will then change (4 for a warning, 8 for an error). Given that this code has already been successful, you already know that it will remain 0. Once the program has been executed in the debugger, refresh the table in the Data Browser screen again, and the record will be visible.

Clear Statement

At this point, the CLEAR statement will be introduced. In ABAP programs, one will not always simply see the program start at the top, insert one data record and continue on. Loops and the like will be set up, allowing, for example, many records to be inserted at once. To do this, variables and structures are re-used repeatedly. The CLEAR statement allows a field or variable to be cleared out for the insertion of new data in its place, allowing it to be re-used. The CLEAR statement is certainly one which is used commonly in programs, as it allows existing fields to be used multiple times.

In the previous example, the work area structure was filled with data to create a new record to be inserted into the zemployees table, then a validation check performed. If one then wants to insert a new record, the work area code can then be copy & pasted below this. However, since the work area structure is already full, the CLEAR statement must be used so that it can then be filled again with the new data.

To do this, the new line of code would read “CLEAR wa_employees.”

If you just wanted to clear specific fields within your structure you just need to specify the individual fields to be cleared, as in the example below, clear the employee number field. New data can then be entered into the work area again:

clip_image032

Remember that the employee number is a key field for the zemployees table, so as long as this is unique, duplicate information could be entered into the other fields. If one tries to enter the same employee number again though, the sy-subrc field will display a warning with the number 4.

You can see the operation of the CLEAR statement in debug mode. The three images below display the three stages of its operation on the field contents as the code is executed:

clip_image034

clip_image036

clip_image038

Update Statement

The UPDATE statement allows one or more existing records in a table to be modified at the same time. In this example it will just be applied to one, but for more the same principles generally apply.

Just as with the INSERT statement, a work area is declared, filled with the new data which is then put into the record as the program is executed.

Delete the record created with the CLEAR statement as before. Here, the record previously created with the INSERT statement will be updated. Copy & paste the work area and then alter, the text stored in the SURNAME and FORENAME fields. Then on a new line, the same structure as for the INSERT statement is used, but this time using UPDATE:

clip_image040

As this is run line-by-line in debug mode, you can see the Field contents change as it is executed:

clip_image042

clip_image044

Once the UPDATE statement has been executed you can view the Data Browser in the ABAP Dictionary to see that the record has been changed successfully:

clip_image046

Modify Statement

The MODIFY statement could be said to be like a combination of the INSERT and UPDATE statements. It can be used to either insert a new record or modify an existing one. Generally, though the INSERT and UPDATE statements are more widely used for these purposes, since these offer greater clarity. Using the MODIFY statement regularly for these purposes is generally considered bad practice. However, times will arise where its use is appropriate, for example of one is writing code where a record must be inserted or updated depending on a certain situation.

Unsurprisingly, the MODIFY statement follows similar syntax to the previous two statements, modifying the record from the data entered into a work area. When this statement is executed, the key fields involved will be checked against those in the table. If a record with these key field values already exists, it will be updated, if not then a new record will be created.

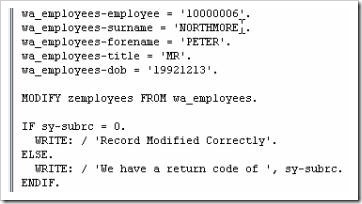
In the first section of code in the image below, since employee number is the key field, and ‘10000006’ already exists, the record for that employee number will be updated with the new name in the code. A validation check is performed next. The CLEAR statement is then used so a new entry can be put into the work area, and then employee 10000007 is added. Since this is a new, unique key field value, a new record will be inserted, and another validation check executed:

clip_image048

clip_image050

When this is executed, and the data then viewed in the Data Browser, employee number 10000006 will have been updated with the new name, Peter Northmore, and a new record will have been created for number 10000007, Susan Southmore:

clip_image052

Delete Statement

The last statement to be looked at in this section is the DELETE statement. One must be careful using this, because if used incorrectly, there is the possibility of wiping the entire contents of the table, however, as long as it is used correctly, there should be no problem of this sort.

Unlike the previous SQL statements, the DELETE statement does not take into account most fields, only the primary key field. When you want to delete a record from a table, the system only needs to be told what the primary key field value for that record is.

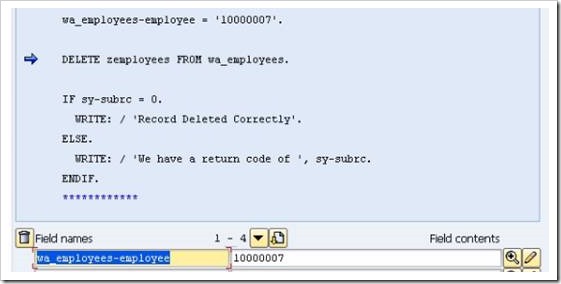
In this example, the last record created, for the employee Susan Southmore will be deleted. For the zemployees table, there are two key fields, the client field and the employee number. The client field is dealt with automatically by the system, and this never has to be included in programs, so the important field here is the employee number field. The syntax to delete the last record created in the previous section would be this:

clip_image054

The FROM addition in the last line ensures only the record referred to by its key field in the work area will be deleted. Again, a validation check is performed to ensure the record is deleted successfully. When this is run in debug mode you can see the fields which are filled with the creation of the record are cleared as the CLEAR statement executes.

After the employee number is filled again the DELETE statement is executed. The code’s output window will indicate the success of the deletion and the record will no longer appear in the Browser view of the table:

clip_image056

clip_image058

clip_image060

clip_image062

clip_image064

The record is now gone from the table.

There is another form of the DELETE statement which can be used. You are not just restricted to using the table key to delete records, logic can also be used. So, rather than using the work area to specify a key field, and using the FROM addition to the DELETE statement, one can use the WHERE addition to tell the program to delete all records where a certain field matches a certain value, meaning that if one has several records which match this value, all of them will be deleted.

The next example will demonstrate this. All records with the surname Brown will be deleted. To be able to demonstrate this, create a second record containing a surname of Brown, save this and view the data:

clip_image066

clip_image068

The code for the new DELETE statement should then look like this. Note the additional FROM which must be used in this instance:

clip_image070

When this code is executed, both records containing a Surname of Brown will be deleted.

clip_image072

clip_image074

Note that, if one uses the following piece of code, without specifying the logic addition, all of the records will in fact be deleted:

clip_image076

SAP ABAP Debugger Scripting

SAP ABAP Debugger Scripting is a new tool added in SAP Netweaver 7.0 EHP2. It is a feature available in the new ABAP debugger. However, just like some of the other debugger options, you need to check whether the security team has provided access for the debugger script tool.

Most of ABAP programmers regularly use Break-Points & Watch-Points for debugging. These are necessary in an ABAP programmers role to find the bugs in custom developments, analyze the Standard SAP program or find a BADi for that matter. So where does this Debugger scripting come into play?

Designed To Make Debugging ABAP Code Easy

The debugger scripting is a tool is designed to make debugging easy. Sometimes debugging can be very tiresome, especially when debugging SAP standard code is involved. The debugger scripting tool can sometimes come to the rescue of ABAP programmers, as it helps automate the process of debugging.

Some of the benefits of Debugger Scripting are:

  1. Automation of repeatedly changing the value of some variable in debugging – You can write a script to do all the changes required.
  2. Perform any custom trace possible – Even track the call to the ABAP stack. It can be used to trace when new programs are called, as the ABAP stack is updated every time a new program is called.
  3. Create custom (conditional) watch-points and break-points. script watch-points & break-point are different from the normal debugger watch-points or break-points. Scripts can be implemented for these to work only when required.
  4. Program Tools for standard tasks like checking data consistency, test error handling, etc.
  5. It can help make the debugging to be user interactive (pop-up based) where one can enter the value, rather can each time double clicking on the variable to change the value. Since the script can be saved and loaded again, this makes the task for programmer easier to use.

A Debugger script is simply a local Object Oriented ABAP program that is run by the New ABAP Debugger. The script uses the ADI (ABAP Debugger Interface) to automate actions and to add capabilities that otherwise would not be available.

So Let’s Take A Look At The Debugger Scripting Tool.

In the new ABAP debugger there is a separate TAB “Script” after the TAB “Diff”(Diff-Tool).

Fig 1 – Tool View

In this TAB, are various options for creating and executing an ABAP script. Let us explore these options.

There is a standard create Create_Button button, to create a new script, as per our debugging requirement. Each new script that is created has four methods that can be implemented. These methods are triggered at specific moments and thus it defines their purpose. Also as you can see in Fig 1, all this code is generated automatically whenever a script is created. Continue reading

Expand Your Horizons

We need to talk about something that, let’s face it, many IT professionals are a bit uncomfortable with. While there are those of you out there who are social chameleons, able to adapt to any situation you find yourself in and thrive, there are still those of us who struggle with no small amount of social anxiety. This fact is true in any profession, so we’re not picking on IT professionals in particular, but this is an IT-centered forum, so it needs addressing in this context. Furthermore, there is a long-running joke out there that may have some underlying layer of seriousness, where IT tends to attract individuals who prefer the logic and consistency of their computers to the strange banality of other people. Whether this stereotype is true or not, the fact is that many professionals struggle with a fundamental concept that is vital to career advancement in any field: networking.

horizon

Networking can expand your horizons.

Networking is a nebulous term. For many people, it calls to mind awkward encounters at rigid business functions making stilted and awkward conversation. There are thousands of articles out there about how to successfully work a “networking event” or how to stand out at a career fair, which in many instances can amount to the same thing. Networking is often uncomfortable and people in any profession often hate to do it.

The right way to network is to do it without thinking about it as networking. To do that, you need to do your homework and overcome some mental barriers you probably have in place about the whole “networking” idea.

First of all, networking should never be aimless. If you are attending a networking event without a clear goal in mind, then you are in for an awkward time. If you send out emails to your potential mentors or contacts with the general purpose of “establishing a connection,” your efforts may be doomed to failure from the start. What does “establishing a connection” or “networking” even mean, then?

Consider this scenario: suppose you have a snarly problem you’re trying to work out in the customization settings for the accounting group in SAP. You’ve tried, but you just can’t seem to get everything working properly. Phone support hasn’t been much help, so you turn to the SAP community. You manage to find an article that alludes to your problem but doesn’t address the solution specifically.

Networking means that, rather than giving up in frustration or trying to rig your own solution, you email the author of that article and ask for some insight. And it’s just that simple. If you make contact, you’ve expanded your network. You’ve started a dialogue, and now it’s up to you to keep it going. They may or may not have the answer to your problem, but even if they don’t, you’ve taken your first step towards connecting with that person.

If this tactic sounds suspiciously non-threatening, that’s because it is. There are no tricks to networking. It’s a matter of putting yourself in touch with people who have similar goals, interests, or areas of knowledge, and communicating with them about the things you have in common. It doesn’t mean you need to make strained conversation about a sports team you have zero interest in following. That kind of attitude will get you nowhere and you’ll eventually be exposed as a phony. But if you make real connections with people that you can offer value, and who can offer value to you, then you’ve just successfully “networked.”

One mental barrier that might hold you back is the simple thought that why should anybody waste their time communicating with you? Do you really have to email the author of that article to get their help? Why would they ever respond to you? And sometimes, people won’t respond to you. You’ll attempt to make contact and the connection will fall flat. You shouldn’t allow that kind of situation to discourage you, because chances are, it has nothing to do with you. But most of the time, you will find people who are ready and willing to help you and to talk to you. And all you have to do is be willing to ask a few simple questions to get the conversation going.

*Image courtesy of rosmary via Creative Commons